
Setup vCenter as Subordinate CA and Replace Host Certificates
Updated – 3/23/22: Added some notes to regarding Certificate Chain Ordering after working working with a customer using a certificate exported directly from the Microsoft Certificate Management Console.
I was trying to replace the self-signed certificates in my vSphere environment – for both the vCenter Server Appliance and the ESXi hosts. The VCSA includes a Certificate Authority (VMCA) to help automate this process for larger VMware environments.
I had trouble getting it to work until I found Adrian Costea’s writings on the topic. His blog helped clarify the process of configuring the VCSA as a subordinate CA. Through a bit of trial and error, I was able to learn how to get vCenter to replace the certificates on ESX hosts using the newly configured CA in vCenter.
Notes:
The steps listed here were performed against the VCSA using vCenter Server 6.7 U3 with an Embedded PSC. It was also tested against vCenter 7.0 U3.
There are security considerations for this approach. This method will turn the Certificate Authority in vCenter (VMCA) into a Subordinate CA based on your Enterprise CA. This is useful; but does come with risk.
Benefits
- vCenter will have certificates based on your Enterprise Certificate Authority. No more Untrusted Certificate warnings. No more typing “this is unsafe” #IYKYK
- All hosts in your vCenter(s) will have the trusted certificates – managed automatically
Risks
- Your vCenter will contain a special type of certificate which is authorized to issue certificates that are trusted by your Enterprise. This could enable a bad actor or rogue employee to potentially issue certificates with that trust – possibly for nefarious purposes.
For most production environments this risk outweighs the benefit.
Hybrid vSphere SSL Certificate Replacement is an option that provides trust that access to vCenter is secure without the Subordinate CA Risk. This is the method recommended by VMware for use in Production environments. Access to vCenter would be covered by the trusted certificate deployed using the Hybrid method. vCenter is where admins should be spending 99% of their time. Your ESX hosts would have a self-signed certificate issued by vCenter. If you like, you can import that root certificate into your administrative computers which can help identify any certs that have been altered. Check out KB 2108294 for steps.
For my purposes (homelab) – the risk and potential impact is small. You should review both options and choose what is most appropriate in light of the security policies in your organization.
Before you begin
It’s always a good idea to take a snapshot of vCenter before making significant changes like this. Make sure you are taking a snapshot of vCenter the right way. While you are at it – take a few moments and configure your vCenter Server Backup.

I recommend that you generate the vCenter Server certificate at least 24 hours before it will be used to replace host certificates. There is an intentional back-date of ESXi Host certificates which can prevent you from renewing the certificate on an existing host or adding a new host to vCenter if the VCSA certificate was issued in the last 24 hours. For more details, refer to the Lessons Learned section.
Another pre-planning step is to take an inventory of all the systems that use the vCenter or ESXi hosts as an endpoint. It is very likely that when these were initially configured, the original self-signed certificate was marked as trusted. If those systems don’t trust the CA you will be using as the new root, you will need to reconfigure the endpoint after your vCenter and hosts have their certificates replaced. Following is a list of systems I had to re-configure in my lab:
- Skyline Collector
- Backup Solution – I use the Veeam Community Edition
- vRealize Suite products (Log Insight, vRealize Operations, etc)
- Horizon View
Replacing the vCenter Server Certificates
vCenter will become a subordinate CA so that it can automatically handle ESXi host certificates. The first step is to generate a subordinate CA certificate and install it in the VCSA. Let’s get started!
Generating the Certificate Signing Request
You will need to enable SSH access to the VCSA. If you did not enable SSH when you first deployed the appliance, you can login to the VAMI (https://vcsa-fqdn:5480) to turn it on now.
You will need to connect to the vCSA appliance using SSH and the root account. Once you have done that you will be presented with the default Appliance Shell.

Launch the Bash shell by typing:
shell.set --enabled true
shell
Next, change the default shell to bash for the root account:
chsh -s /bin/bash root
Setting the default shell to bash will allow us to use SCP later. This setting can be reversed when we are done. The full details for this process can be found in KB 2100508.
Now, launch the Certificate Manager
/usr/lib/vmware-vmca/bin/certificate-manager
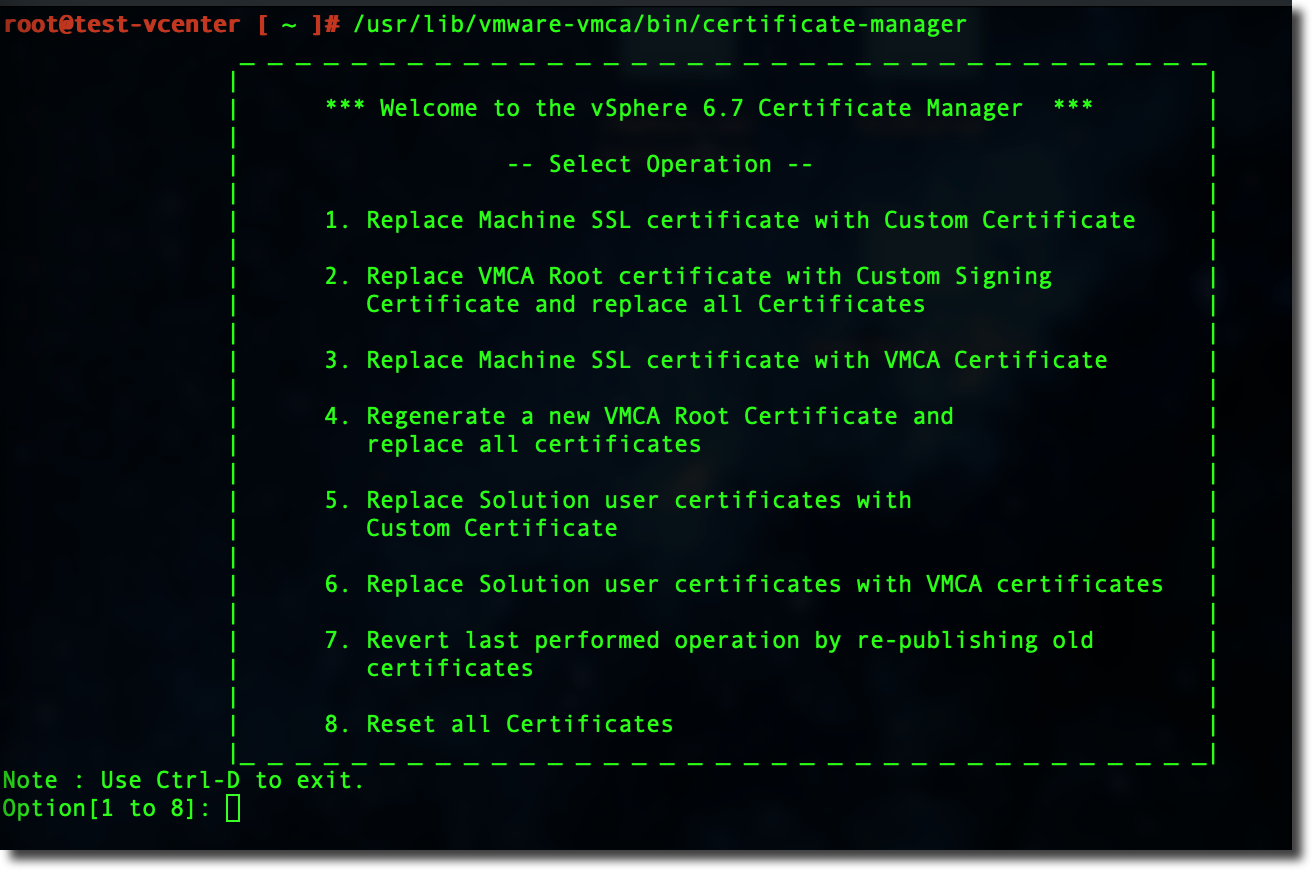
Choose option #2 to replace the VMCA Root Certificate with a customer certificate and replace all certificates.
When prompted if you wish to generate certificates using a configuration file – enter Y
Next, you will be prompted to provide the information needed to fill out the certificate signing request
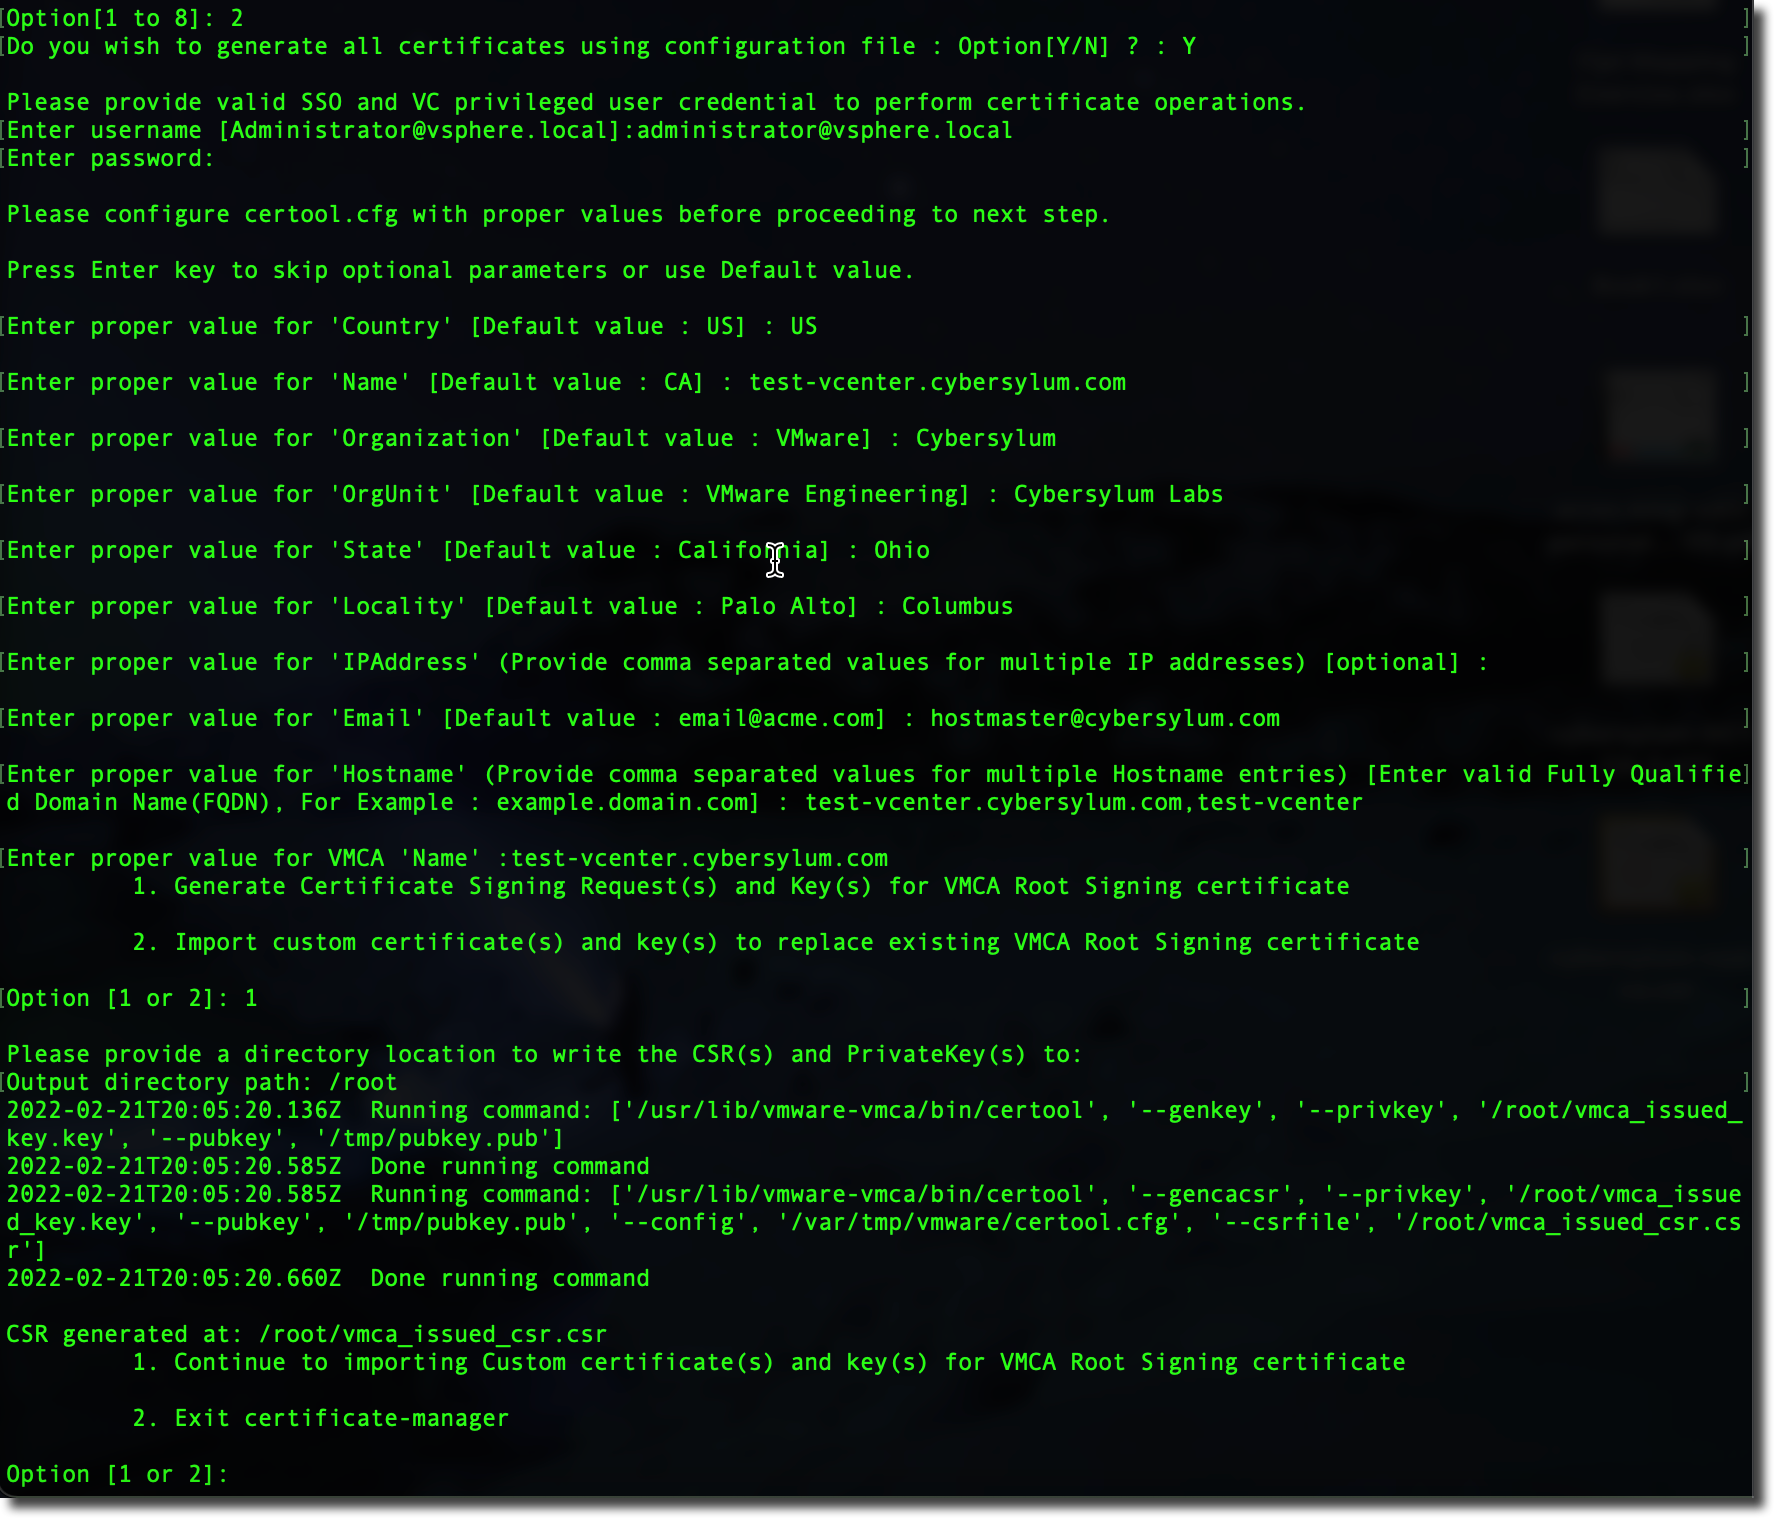
Most of these are fairly self-explanatory. There are a few that are important as their values need to reflect how you will interact with the vCenter:
- IP Address – This is an optional field; but important if you intend to access your vCenter by IP Address
- Hostname – I recommend using the FQDN as well as just the hostname (separated by comma). This will ensure the certificate is valid no matter what you type in the address bar
In the example above, I saved the files to the /root directory. This is a safe choice in most environments. You can certainly create a new directory and use that.
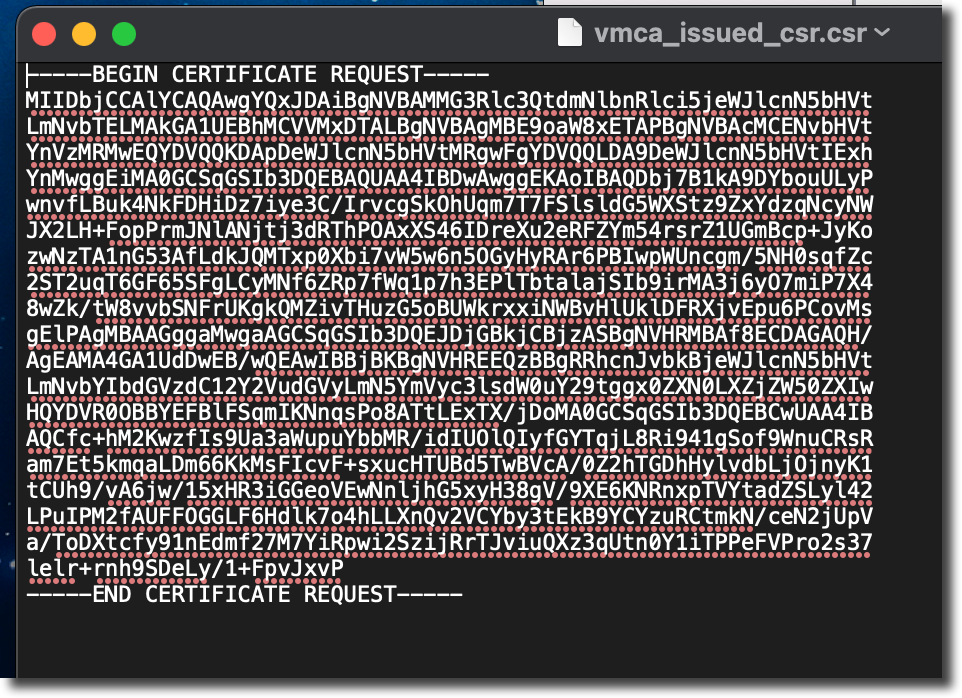
The certificate manager creates 2 files:
- vmca_issued_csr.csr – This is the certificate signing request. We will use this file to request a certificate in the next step
- vmca_issued_key.key – This is the private key that corresponds to the CSR. We will use this when installing the certificate issued from the CSR.
Requesting the Certificate
TIP: To complete the next few steps, I will need to transfer some data between the VCSA and my computer and then back again. I will be using SCP to transfer files. As the files we are working with are really text files with formatted data, you can also use copy and paste to transfer the contents if you are comfortable with that – and careful to not modify the data accidentally.
At this point I need to download the CSR to my desktop so that I can submit it to the CA. On my desktop computer, the following scp command will download the CSR file:
scp root@vcsa:/root/vmca_issued_csr./csr vmca_issued_csr.csr
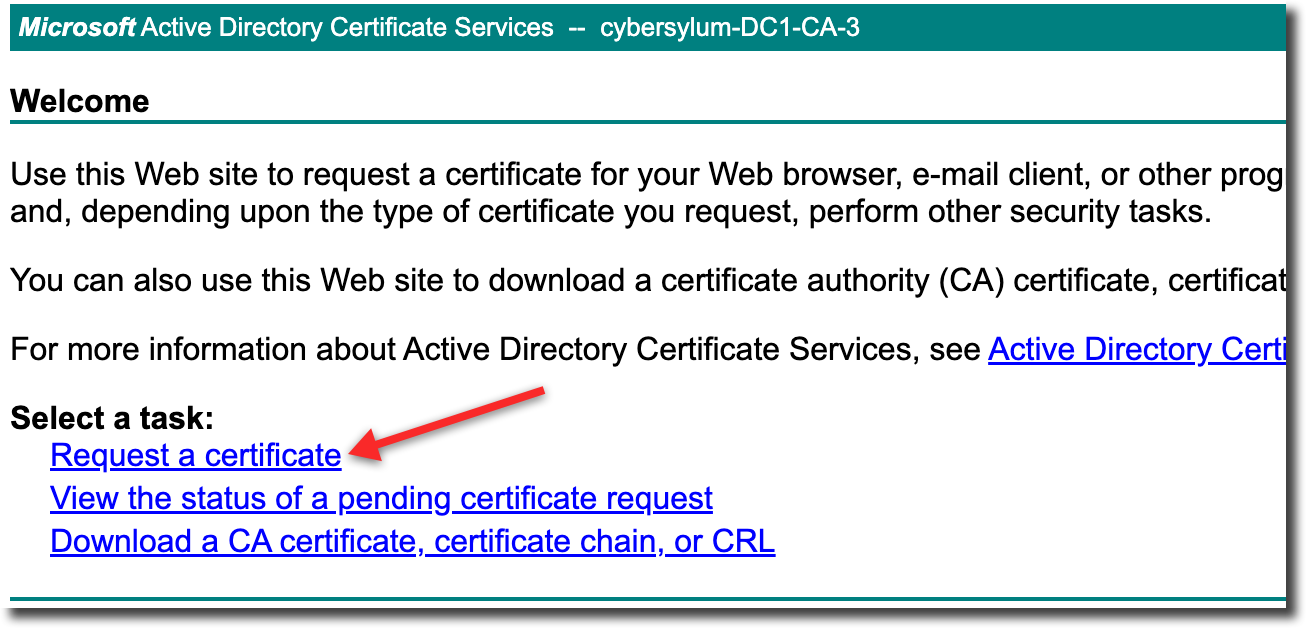
I am using the Microsoft Certificate Authority as my Enterprise CA. We’ll access the web request portal to obtain the certificate. For a Microsoft CA this is usually – https://ca.fqdn.com/certserv.
After logging in, you will want to click the Request a Certificate link
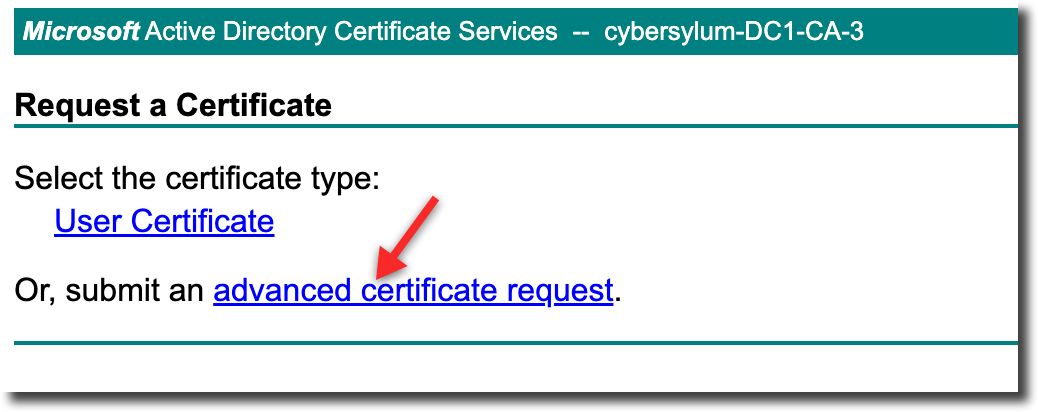
This process requires a specific type of certificate, choose the Advanced Certificate Request link
Leave your web browser open, and locate the file you downloaded from the vCenter Certificate Manager (vmca_issued_csr.csr). Open this file in a text editor
You will need to select all and copy
Switch back to your web browser and paste the CSR file contents into the Base-64-encoded certificate request field.
Make sure you select the Subordinate Certification Authority in the Certificate Template dropdown
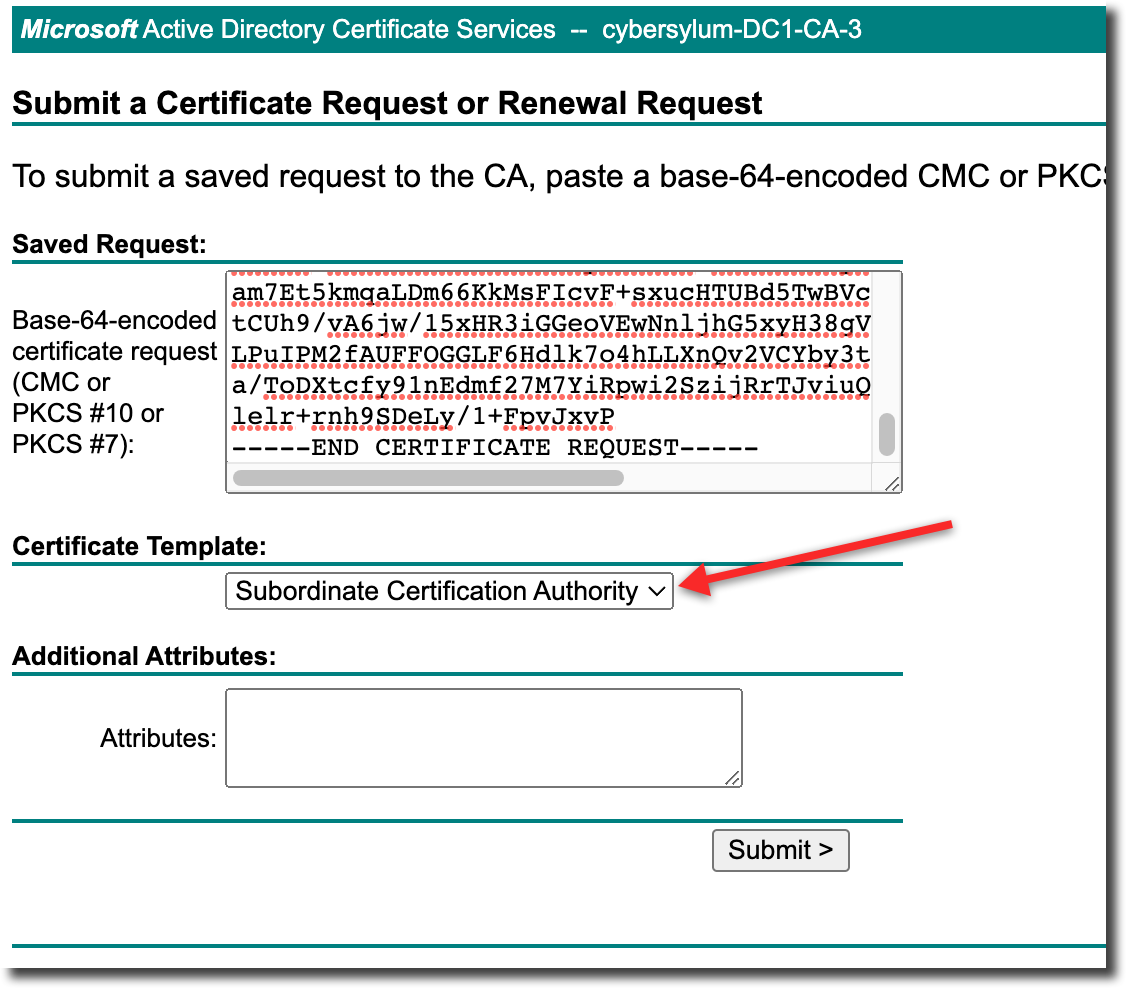
Now click Submit
A certificate will be issued and you will be presented with the option to download the new certificate. Depending on your organizational policies, this may require review and approval.
Be sure to choose the Base 64 encoded option
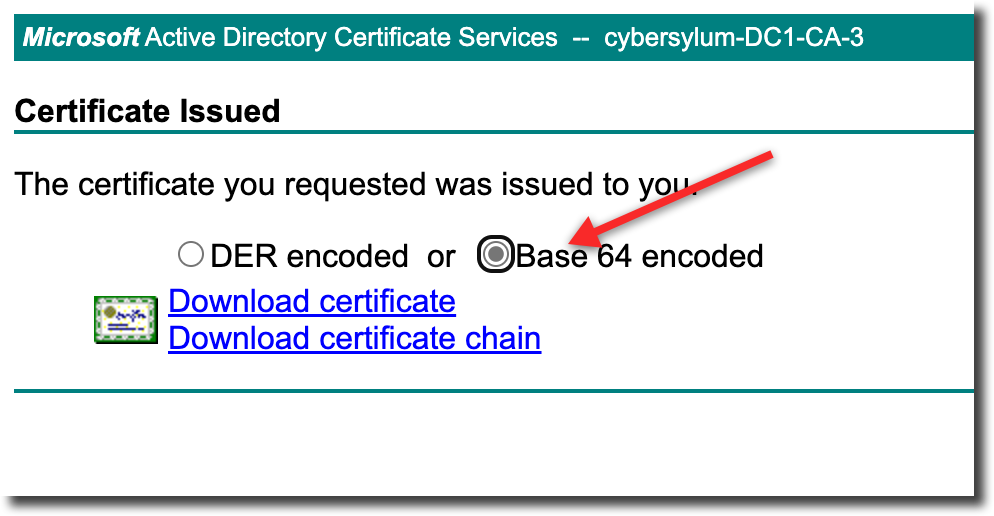
You will want to download both the certificate and certificate chain. This will result in 2 files on your computer:
- certnew.cer – This is the certificate we will install on the VCSA. I renamed this to match the FQDN of my vCenter – test-vcenter.cybersylum.com.cer
- certnew.p7b – This is the certificate chain including the root certificate of my enterprise CA. This certificate chain file is in a different format (PKS #7 / .p7b) and will need to be converted to PEM / .cer format before we can use it. OpenSSL can help with this. If you need to install it, a good place to start is OpenSSL.org.
On my computer, I can use OpenSSL to convert the certificate with the following command:
openssl pkcs7 -print_certs -in certnew.p7b -out cybersylum-ca-chain.cer
Preparing the new Certificate for Installation
The next step is to combine these files into a single file that has the new certificate and full certificate chain together.
Open your text editor and save a blank file – I called mine – test-vcenter.cybersylum.com-full-chain.cer
TIP: You don’t have to create a blank file and save it. I think it safer to do so – and have the scars to show it!
Next, open the file for the certificate that was just requested (test-vcenter.cybersylum.com.cer in my example).
- Select all text and copy
- Paste this into the new empty file (test-vcenter.cybersylum.com-full-chain.cer)
- Save
Next, open the full chain file (cybersylum-ca-chain.cer)
- Select all text and copy
- Paste this at the end of the test-vcenter.cybersylum.com-full-chain.cer file. You should paste on the line after the —–END CERTIFICATE——-
- Save
If you are unsure that you are assembling this correctly, consider the following graphic (click to enlarge):
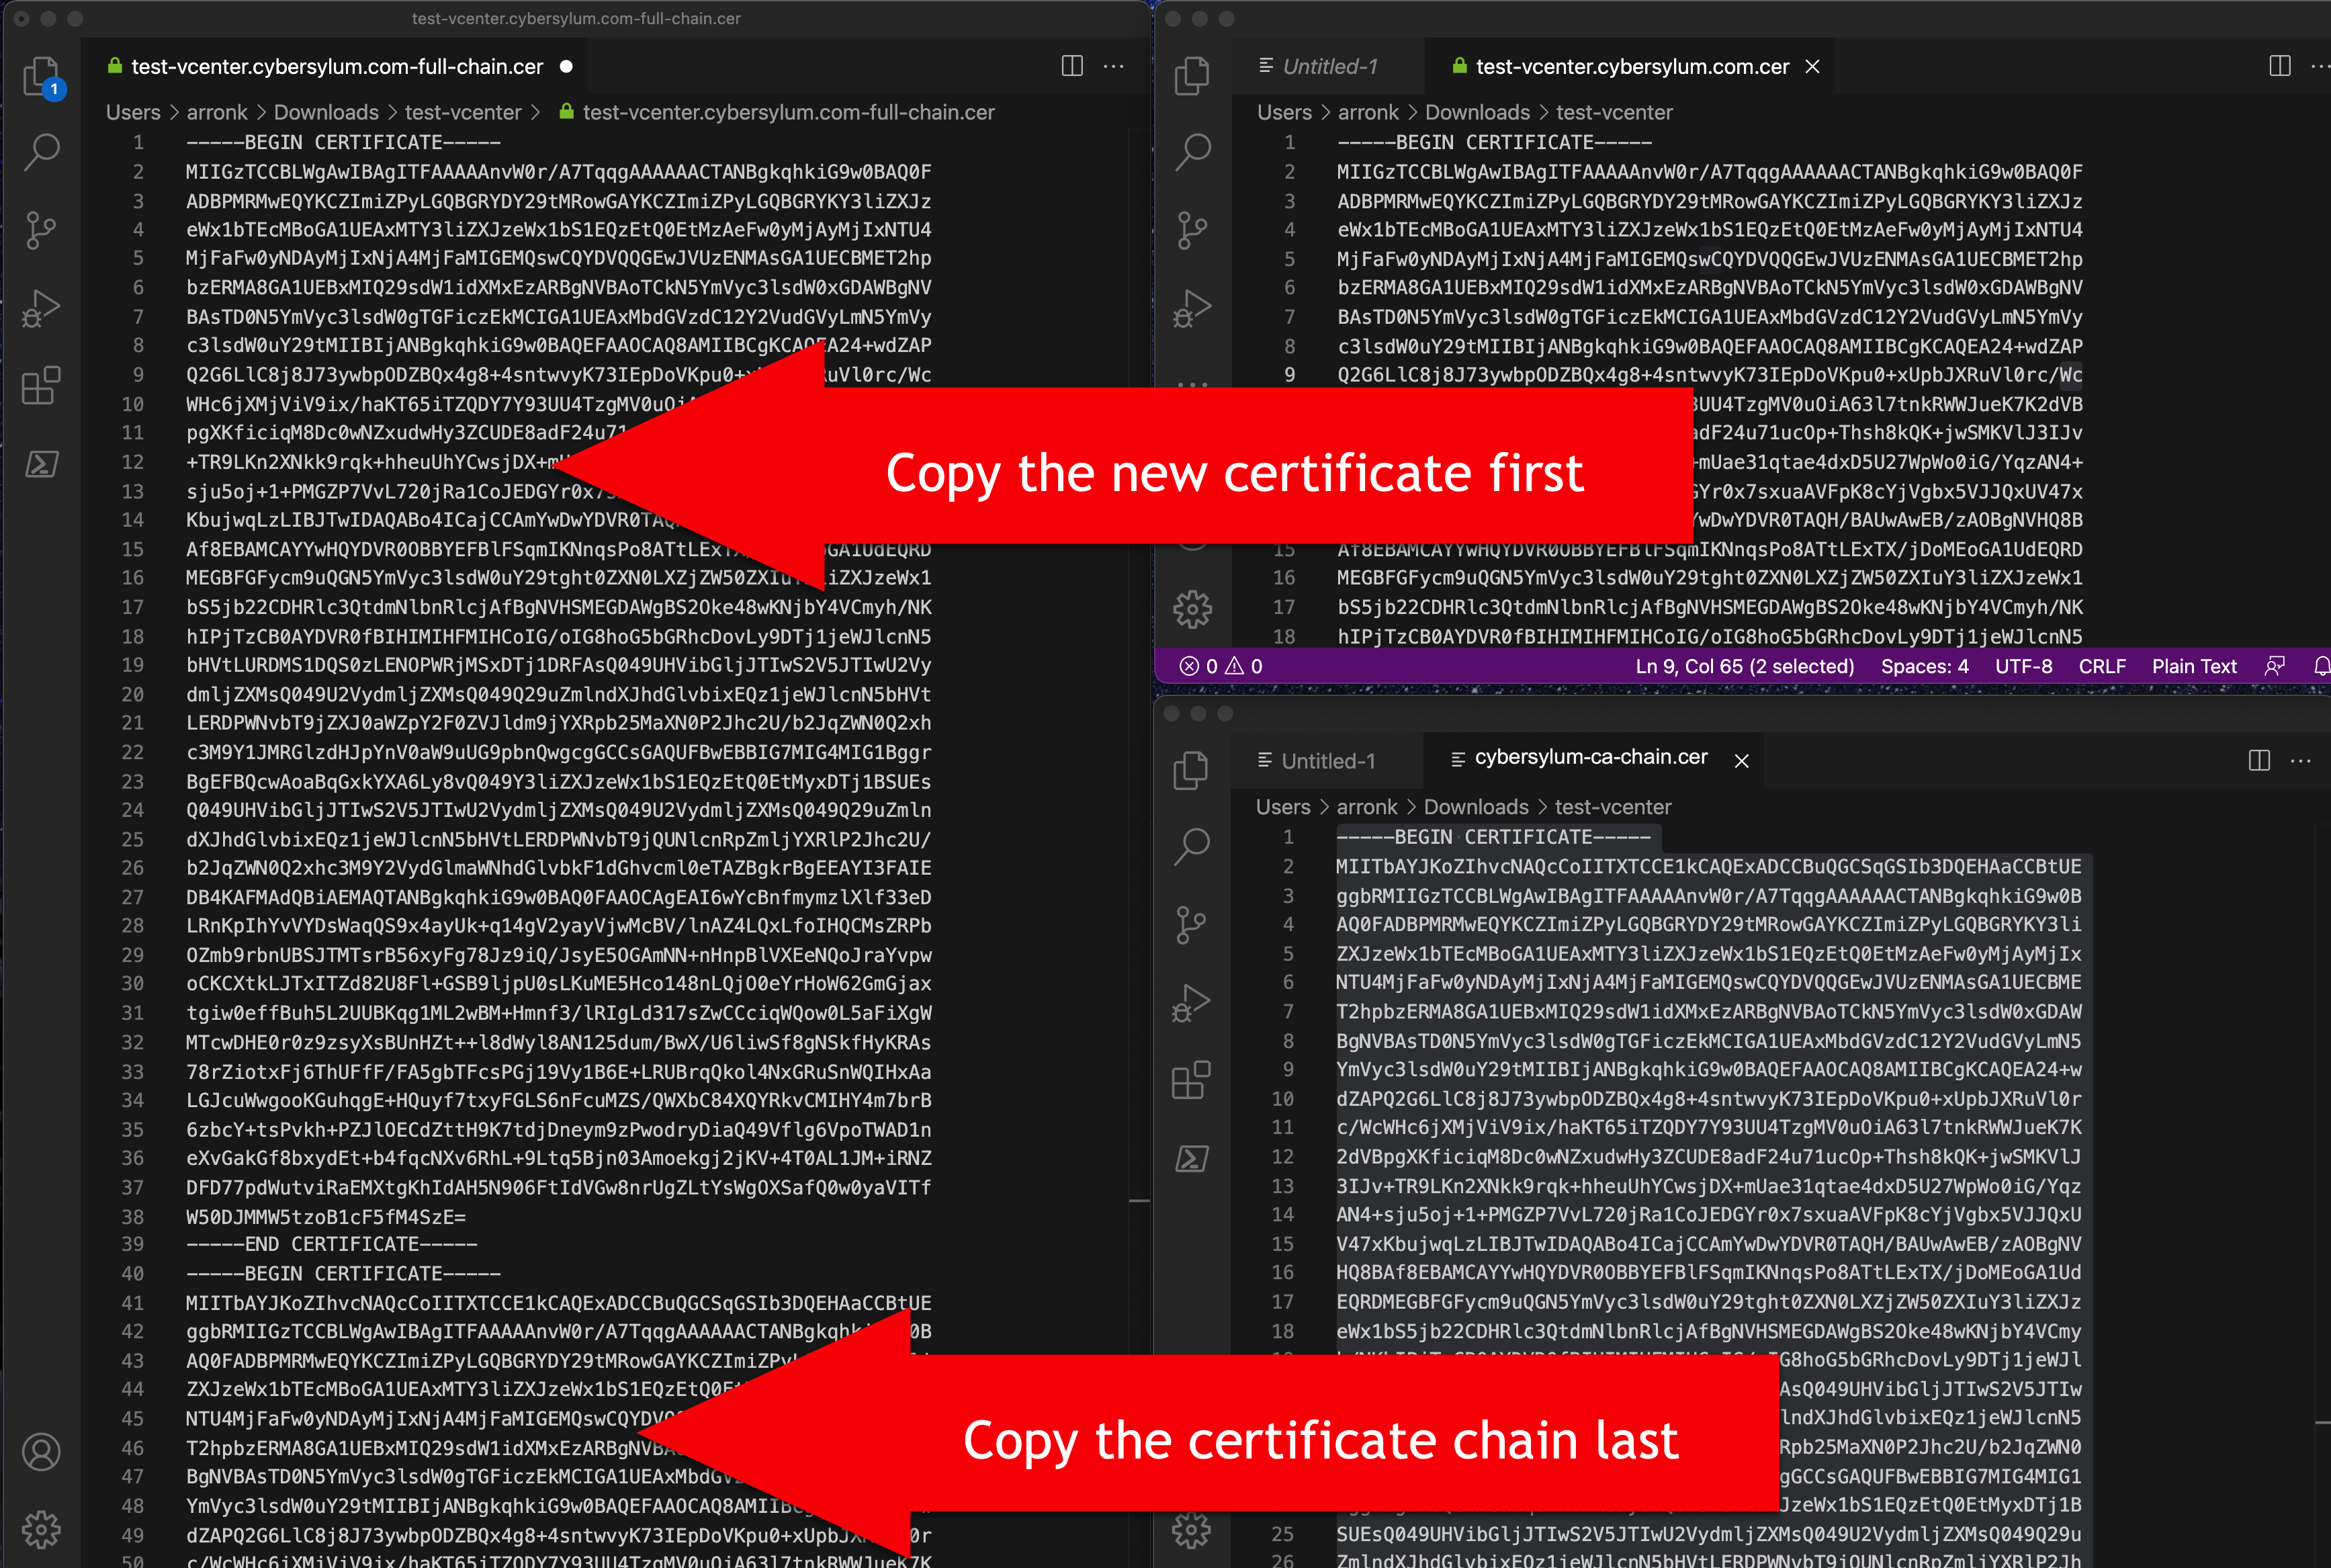
Some certificate authorities are configured with multiple intermediate CAs. In this case you would need to include all of them to form a complete chain.
This certificate file (which now includes the full CA chain) is ready to be uploaded to the VCSA
scp test-vcenter.cybersylum.com-full-chain.cer root@vcsa:/root/test-vcenter-cybersylum.com-full-chain.cer
Installing the Certificate onto the VCSA
Now, switch back to the SSH session you had open to the VCSA.

Choose Option 1 to begin importing the new certificate. Your next steps will be to provide the names of the files – skip ahead
If you exited the Certificate Manager earlier, you can start it up again and resume from where you left off. To Start Certificate Manager:
/usr/lib/vmware-vmca/bin/certificate-manager
You will be prompted if you want to generate all certificates using configuration file – enter Y
Since you have already generated the configuration file, you will be notified that certool.cfg exists do you wish to reconfigure – enter N

Next, choose option 2 to import the certificate
Providing the names of the certificate and private key
Now you will be prompted to provide the names of the certificate files
The first prompt will for the file which contains the new custom certificate. This will be the test-vcenter.cybersylum.com-full-chain.cer file we uploaded to /root
The second prompt will be for the private key that was generated when we initially created the CSR This is vmca_issued_key.key and is also located in /root

Note: This step will take a few minutes and cannot be interrupted.
Hit Y to continue the certificate replacement
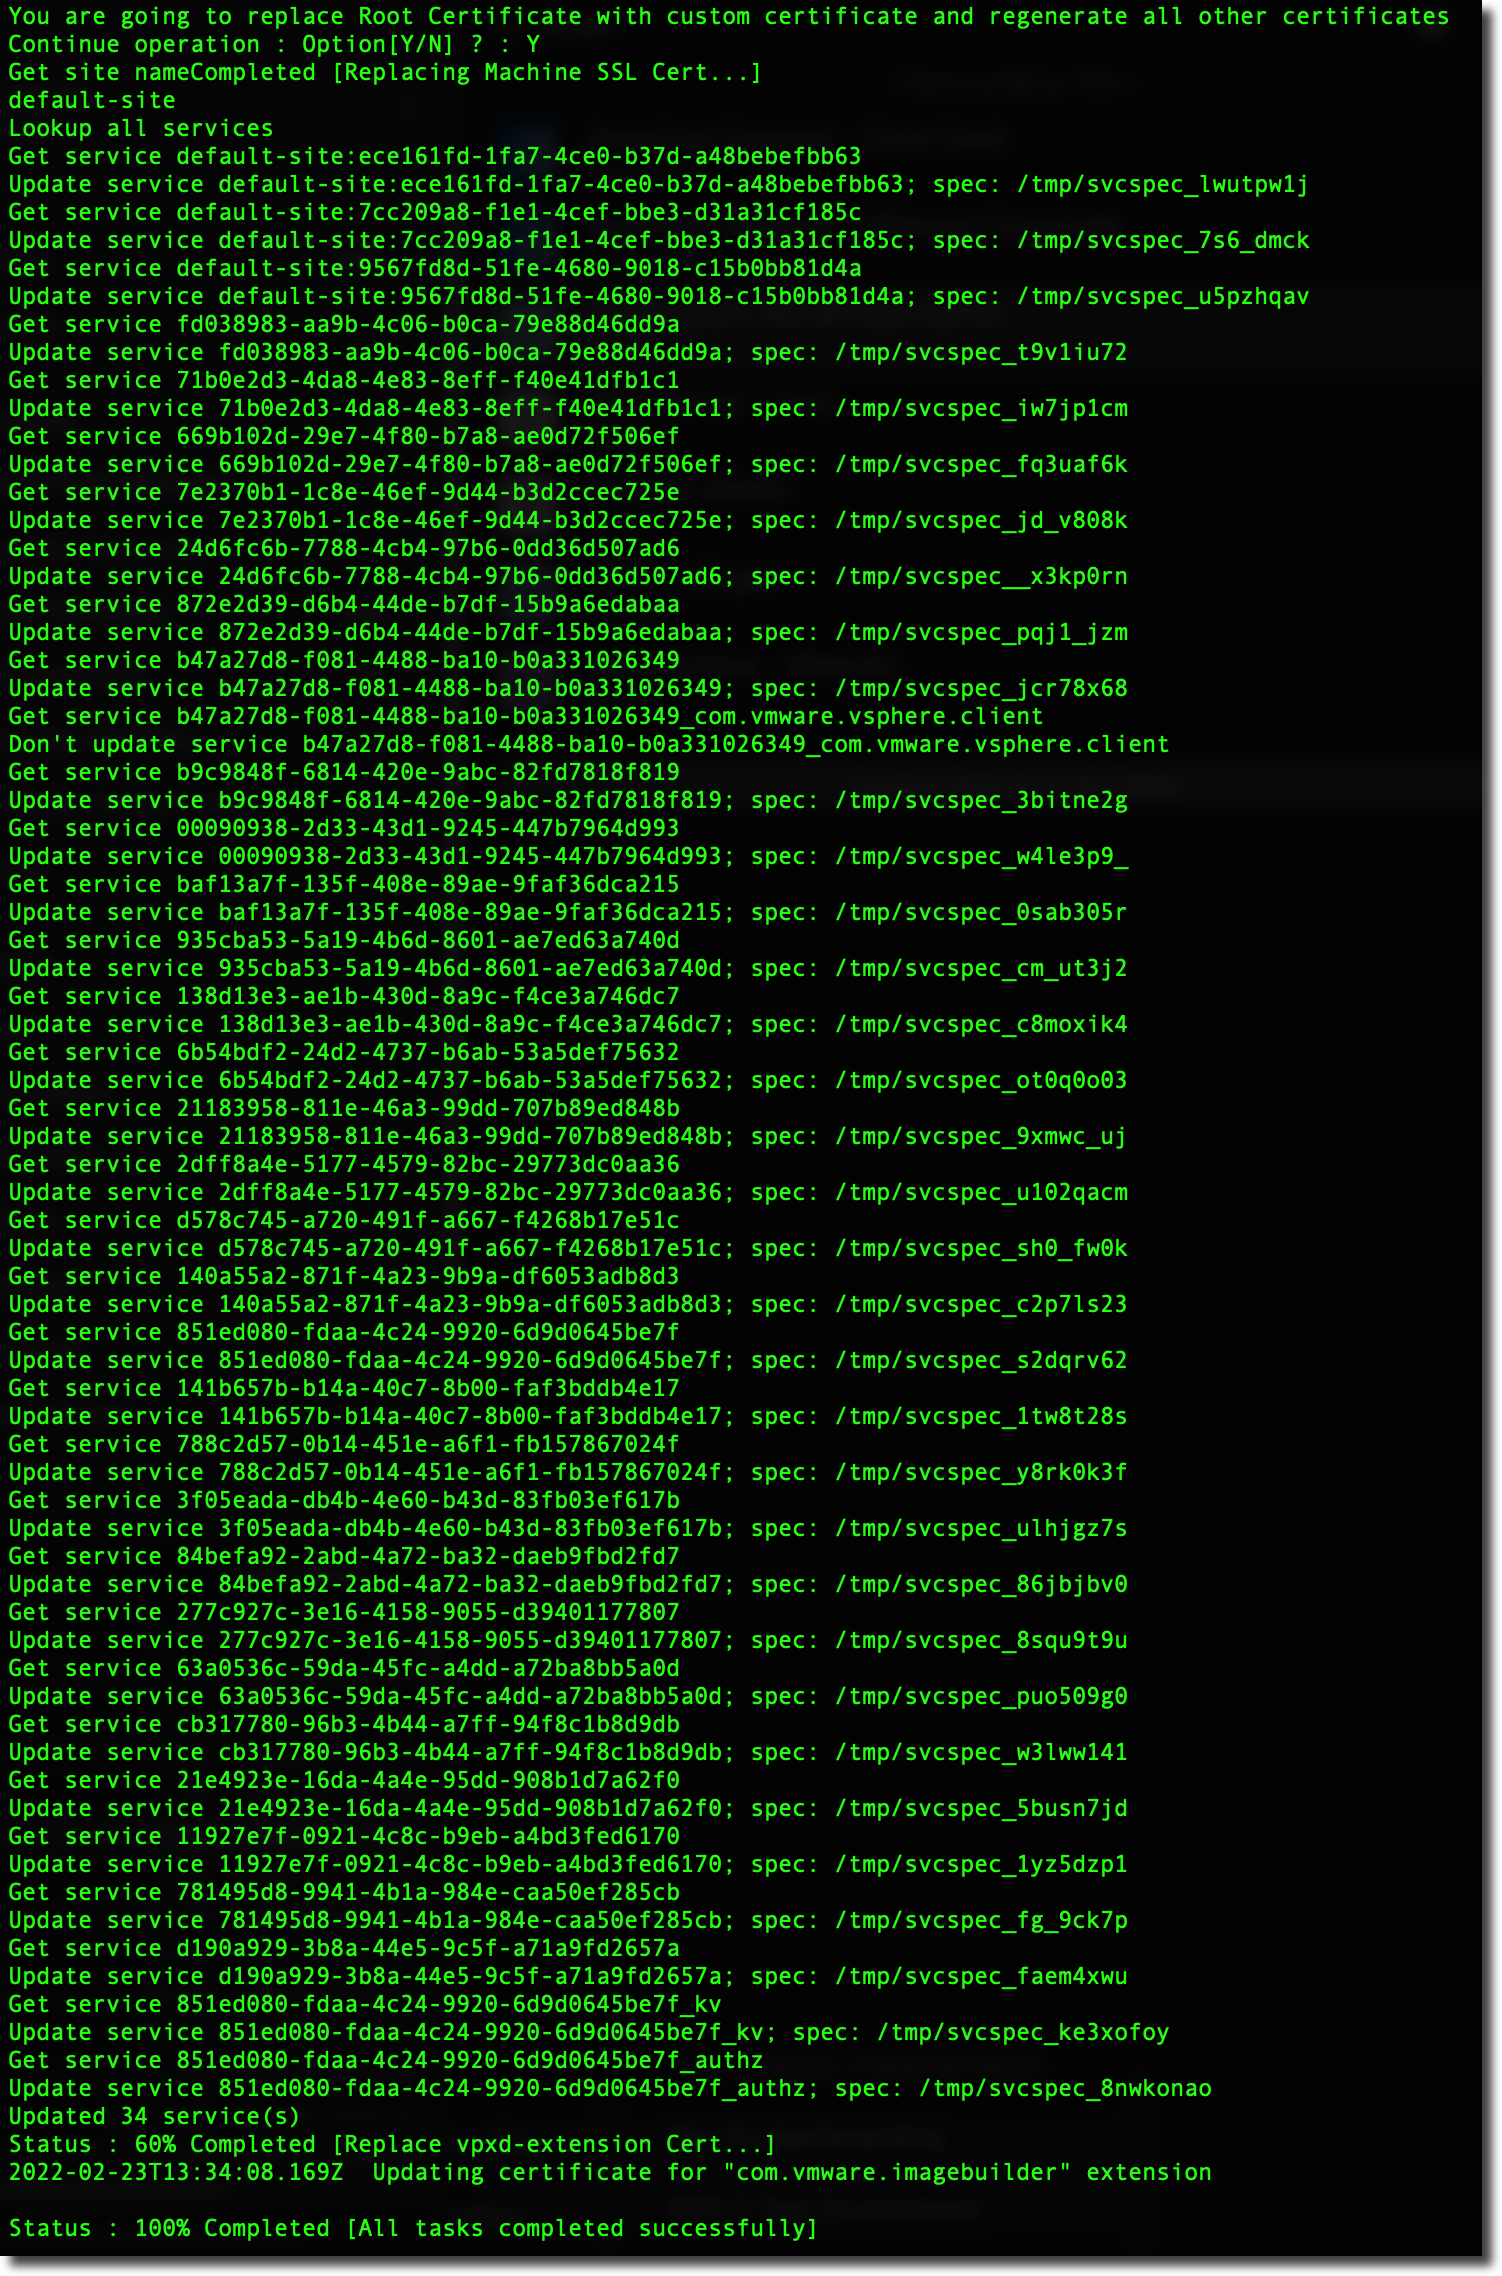
Verifying the certificate in vCenter
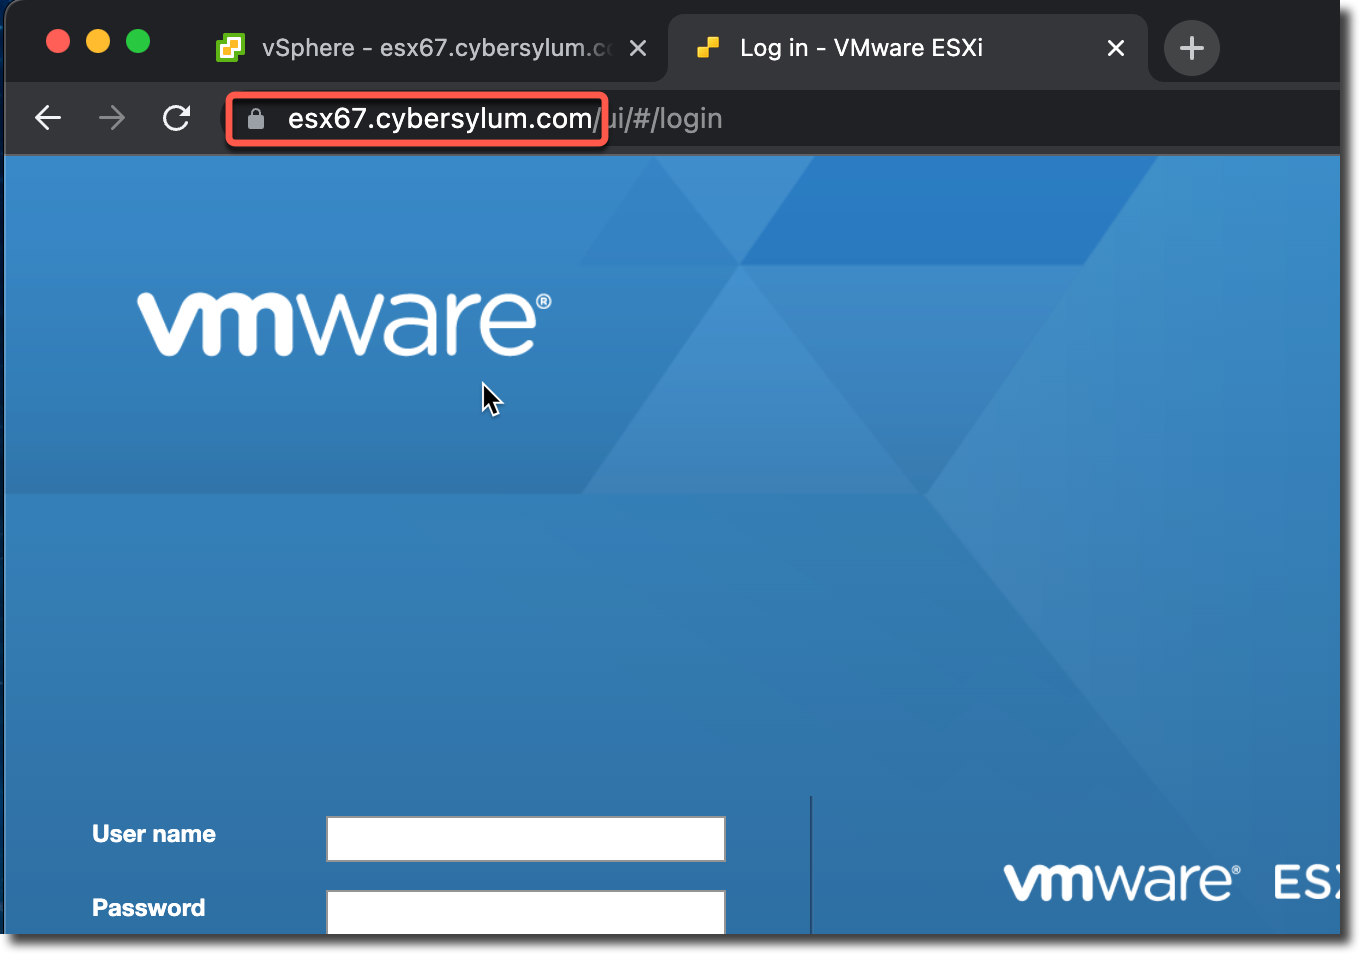
Now it is time to point your web browser at your vCenter and test! In my case this is https://test-vcenter.cybersylum.com
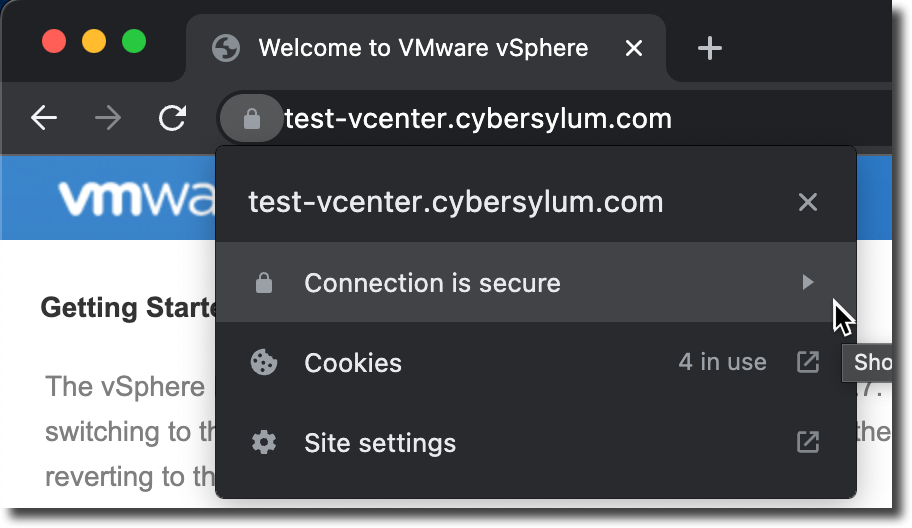
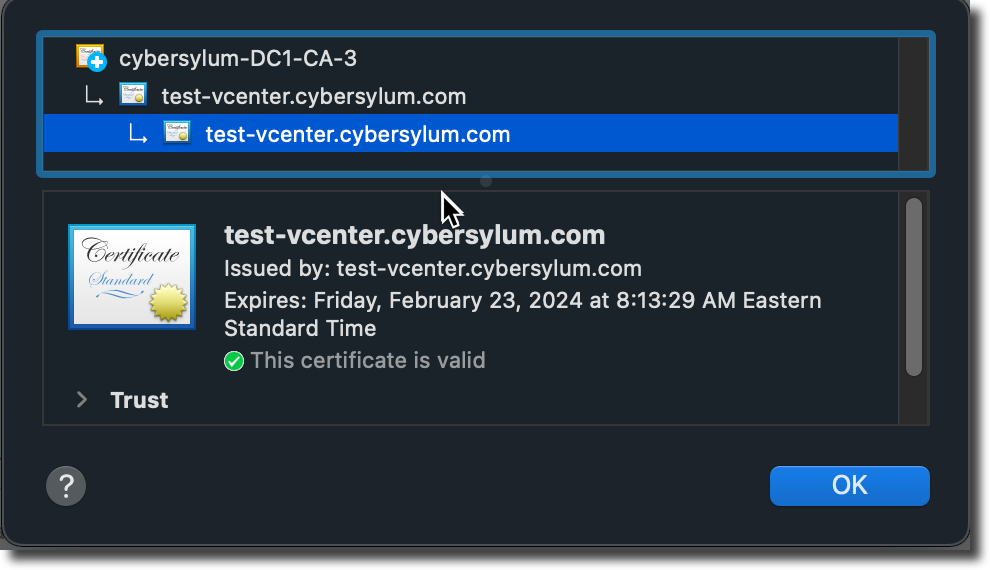
Congratulations! You completed the big part and are almost done!
Updating Certificates on ESX Hosts in vCenter
Tip: Hang on to the snapshot of your vCenter Server just a while longer. It may still be needed…
![]()
The certificate installed on the VCSA must have an issue date of at least 24 hours before ESXi Host certificates can be replaced. For more details, refer to the Lessons Learned section.
Now that the vCenter Server is a subordinate CA in your Enterprise CA Chain, it is time to update certificates on your ESX hosts. Any new hosts to this vCenter will have this done automatically when they are added. Existing hosts have two steps that need to be performed.
Generating new certificates on the hosts
If you look at the certificates on an existing host, you will notice the Issuer is most likely VMware Engineering. This is the original self-signed cert issued by the VCSA before it became a subordinate.
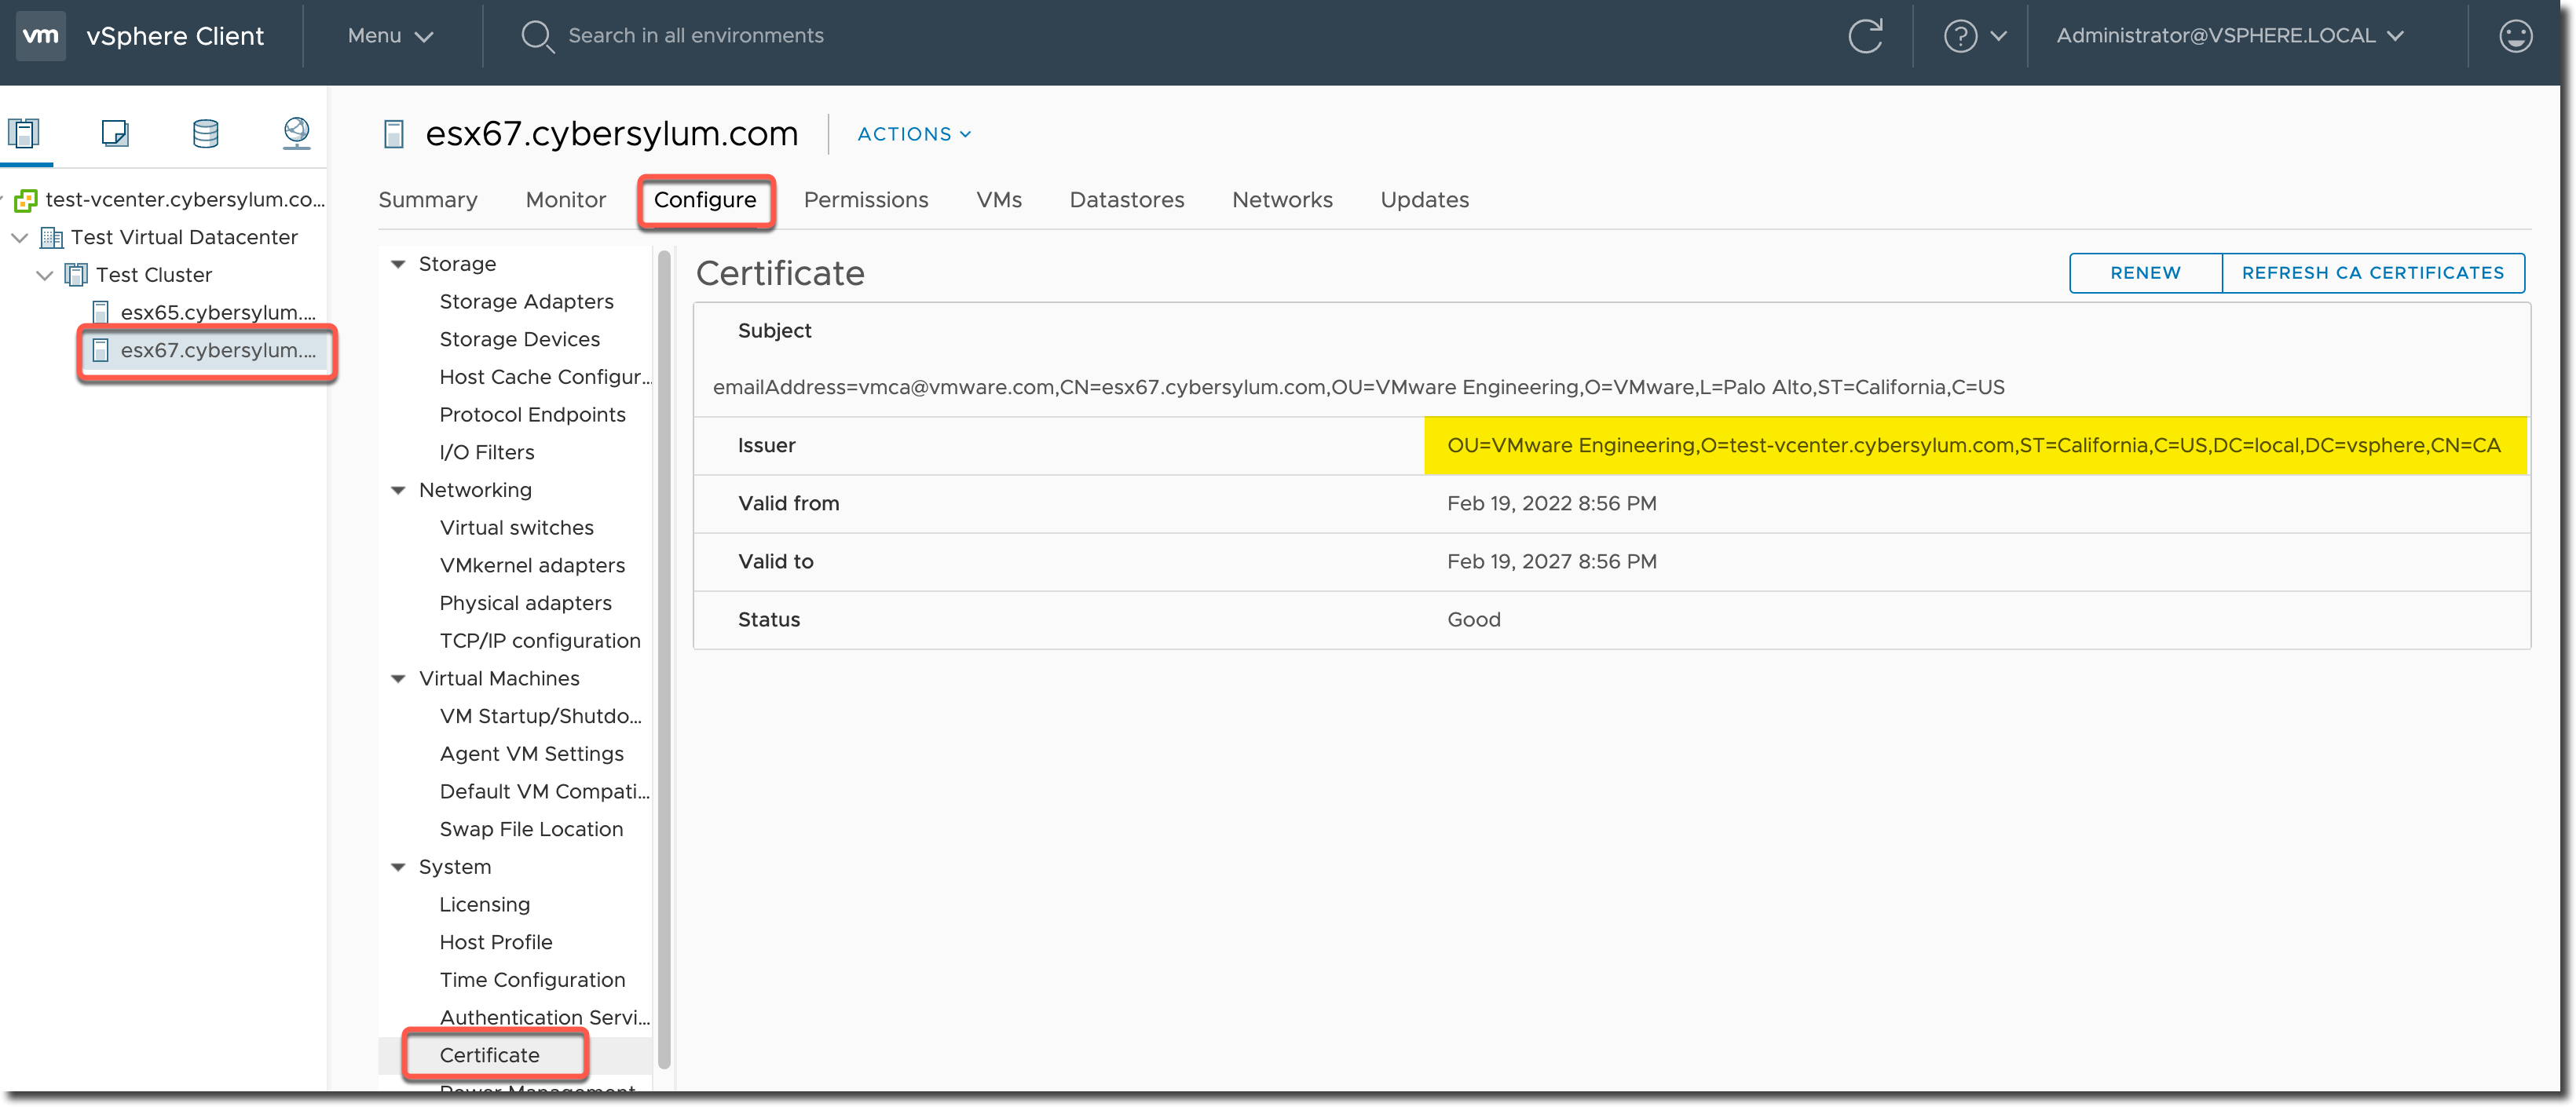
In order to replace the host certificate with one that is issued with the new Enterprise CA trust chain, you will need to right-click an ESX Host in vCenter, choose Certificates and then (in order) select:
- Refresh CA Certificates
- Renew Certificate
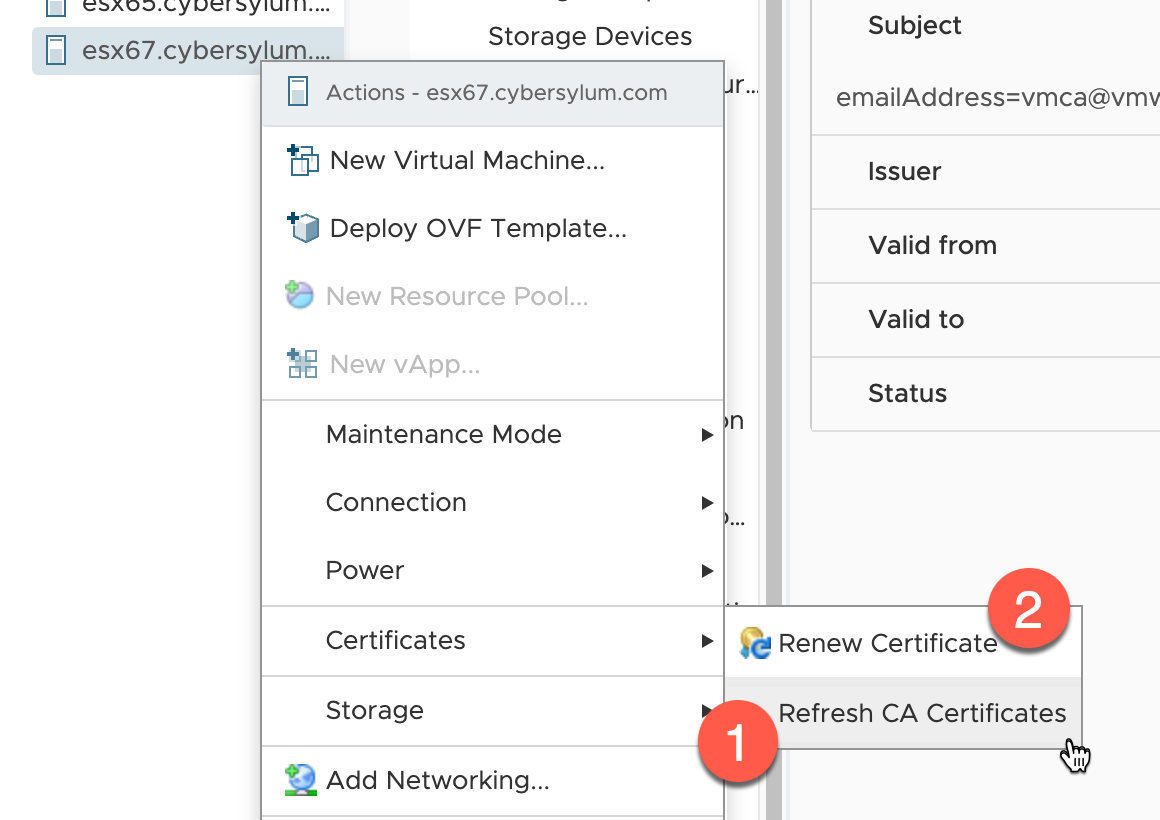
You will be prompted for confirmation at each step.
Allow each step to complete before moving to the next.
During the Renew Certificate step, you may see some notifications under Recent Tasks in vCenter about activity to the host. This is part of the process.
Once these steps are performed the ESX host will have a new certificate issued by the vCenter Server Certificate Authority that is trusted by your Enterprise CA.


If you have a large number of hosts, you may want to check out how PowerCLI can help automate these repetitive steps. VMware Code has a sample script you should check out.
Cleaning up
Once you are comfortable that everything is working well there are a few steps to close out this project:
- Check all services using vCenter as an endpoint and re-register them as necessary to accept the new certificate.
- Set the Shell settings back to defaults in the VCSA
chsh -s /bin/appliancesh root
- Delete any snapshots on vCenter
- Disable SSH on the VCSA (if that was your preferred setting)
Lessons Learned
ESX Host Certificate Pre-Dating
During my first attempt to replace the certificate, I ran into an error when applying the certificate to the VCSA using the Certificate Manger in the CLI. I didn’t manage to grab a screenshot of this; but since I had a snapshot of the VCSA, I was able to revert quickly and work through my issue. It turns out I had typed an errant character accidentally when combining the certificate with the CA Chain.
I also ran into an issue after I was able to get the certificate installed onto vCenter correctly. I was trying to Renew the Host Certificate and ran into the following error
A general system error occurred: Unable to get signed certificate for host name: Error Start Time Error
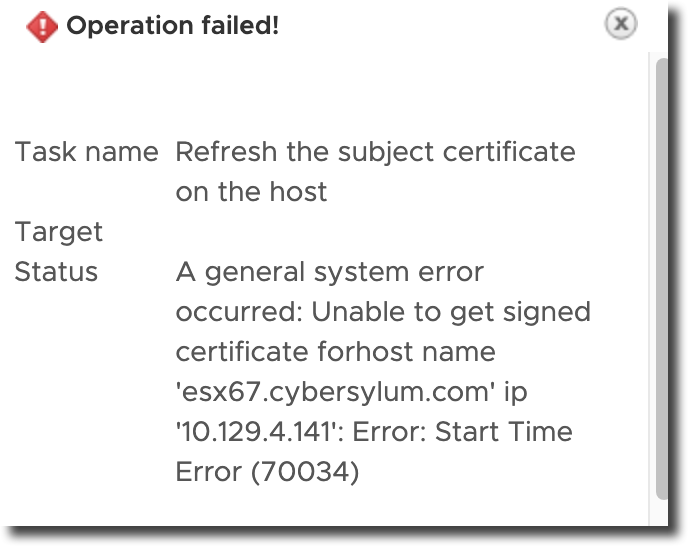
It turns out that when adding a host to vCenter, the VMware Certificate Authority pre-dates the ESXi host certificate by 24 hours to avoid time synchronization issues. This is documented in KB 2123386. The certificate I had installed was issued just a few hours before.
This causes issues for adding a host to vCenter or renewing the certificate of an existing host. If the certificate in use by the vCenter Server Certificate Authority is less than 24 hours old, it will not be able to issue new Host certificates that are valid as the host certificate would be issued before the CA itself was valid.
This will have the following impacts on your VMware environment:
- Hosts cannot be added to vCenter
- Existing hosts will not be able to renew certificates.
My recommendation is to generate the VCSA certificate at least 24 hours before you want to use it.
Update from 3/23/22 – I recently worked with a customer who was not able to use the Web Interface to obtain certificates from their MS Certificate Authority due to security policies. We were able to use the Certificate Management Console to successfully request the certificate.
Using the console, we were able to export a single certificate file that contained the newly created certificate, the certificate chain, as well as the private key. Using a few OpenSSL commands, we were able to convert the file to PEM format (from PFX), remove the private key password (required when exporting from MS CA). and then extract the key into a separate file. Refer to xolphin.com for the command list.
This should have been the two things we needed – a certificate file with the full chain as well as the private key file . When we followed the steps above to install this certificate, we ran into an error on the VMware Certificate Authority (VMCA)
Error Code : 70063
Error Message : Invalid Certificate Chain was gives as input.
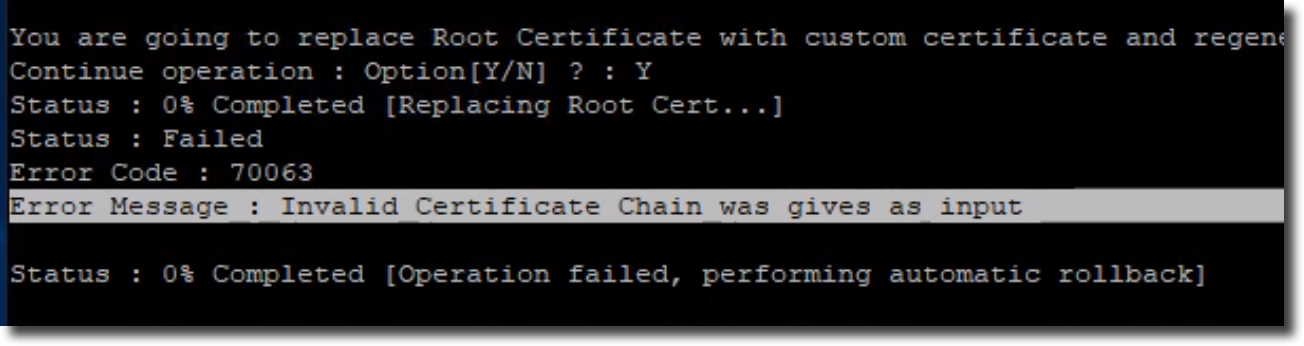
After some trial and error, we realized that the certificate file was ordered incorrectly. The Certificate Authority had an Intermediate CA between our vCenter and the root CA so there were actually 3 different certificates in the file we were trying to import. To narrow down the issue, we did some testing with the individual certificates that made up the certificate chain.
We copied each certificate from the original file into a separate file and then imported that into the Personal store of a Windows machine and realized the order was:
- Machine certificate
- Root CA certificate
- Intermediate CA certificate
The VMCA needs the certificates to be in this order:
- Machine certificate
- Intermediate CA certificate
- Root CA certificate
Correcting this was a simple cut & paste in Notepad. With the individual certificates that make up the chain in the proper order we were able to successfully change the certificates on the VCSA.
7 thoughts on “Setup vCenter as Subordinate CA and Replace Host Certificates”
Excellent article Arron, thank you.
I am glad you found it helpful!
How can i change subjects data “VMware Engineering” in new certs on my custom data? Thanks
VMware self-signed certificates commonly have “VMware Engineering” in the Organizational Unit (or OrgUnit) part of the certificate signing request. You can enter any value you like when you create your own certificate signing request.
Hi Arron,
Thanks for your guide!
I tried to follow it and recreate the steps for a vCenter version 8, and it worked about 50%. Everything is fine up to step “Installing the Certificate onto the VCSA”. When I do this, I provide the path/filenames of the private key and certificate, and move on.
The process starts and ends immediately in an error:
“ERROR:: INVALID_KEY, the private key does not match the certificate. Please provide a valid certificate and Key pair.”
I can’t imagine why my certificate and key pair are not matching. I followed your guide, created the CSR on the VCSA, requested the certificate at my internal homelab CA, and got everything ready to put it into my VCSA.
Thanks!
Karl
Thanks for reading Karl! I did not encounter the message you are seeing when I have worked with vSphere and SSL certificates. I wrote the article using vCenter Server 7. The vCenter is now at 8.0 U2. I have not re-run this process with that vCenter version. I did recently change this vCenter from a Subordinate CA to a Hybrid model to help document the process for a customer. This involved requesting a Machine SSL Certificate and I had no issues with the private key matching the generated certificate. The basic certificate request process is the same, with the requested certificate being a Web Server template versus a Subordinate type.
Here are two immediate thoughts:
Let me know how it goes…
There have a been a few comments recently asking about issues with this procedure and vCenter 8.0 Update 2b. At the time this comment was written, I am not aware of any issues with this release in regards to the VMCA. However – I am not a support engineer and this version was released just a few days ago.
If you need support please visit the VMware Support Portal and open a support request, or ask on the VMware Communities site.
Another consideration is that approach recommended by VMware for certificates and vCenter is to use the Hybrid SSL Certificate method. This will encrypt the communications with vCenter while avoiding certain security risks.
Comments are closed.